whimsy

whimsy

Saturday, 29 December 2012

nana's singer sewing machine

A few days ago quite out of the blue my mum arrived at our house with my nana's old sewing machine. I love it. It's the machine mum learned to sew on. I also have mum's first machine ( the one I learned to sew on) and a machine I bought with my inheritance- so it's just nice all around. one day the kids will learn to sew on one of the three- perhaps not nana's though! : ). 

I love how it looks sitting on top of my craft cupboard.


Thursday, 27 December 2012

a cloud mobile for baby

There's a new baby coming into our family early next year. My brother and sister in law's third child. I wanted to include my future nephew or niece in my Christmas pressie giving so made a mobile from what I had at home. I thought I'd try and wrote a how to in case you also wanted to make one.


You'll need:

- red, orange, yellow, green, blue and purple ribbon cut in the following lengths: red 45cm, orange 40cm, yellow 35cm, green 30cm, blue 25cm and purple 20cm.
- white fabric and cotton
- stuffing
- fishing line string
- 2 buttons with matching embroidery thread
- red or pink embroidery thread
-an embroidery needle
-pins
-a sewing machine ( but you could easily hand sew it)

1. With right sides together- draw a cloud shape on the fabric allowing for a 1.5cm hem.
2. Cut the cloud shape out
3. On the right side of one piece sew on the button eyes and stitch a mouth


4. Pin right sides facing each other
 

5. Along the bottom of the cloud remove a pin at at time and insert the ribbons so that they're inside the cut out cloud pieces ( see the picture). Start on the left with red and finish on the right with purple.

I've moved the fabric a bit so you can see that the ribbon is inside
6. Sew around the cloud leaving a gap at the top of the cloud for putting the stuffing in
7. Remove the pins and turn the cloud inside out so that the right side is out.
8. Stuff it
9. Sew the opening shut
10. Use a needle to thread a piece of fishing wire at the top of the cloud towards the left of the centre point,  and carry this thread over to the right side of the cloud- thread through and knot.
11. Find the centre balance point on this string and tie a second longer piece of fishing wire in the middle point- experiement a bit to find where it hangs best.

Whew! Tutorials are not very easy to write!

The fabric I used was an off white piece of crushed silk my best friend gave me- it was left over from making her wedding dress : ) I like the bumpiness of it - I think white felt would also look good.

Here's the finished product- I hope baby T likes it.


Joining in with Sunshine x3's show & Tell http://3xsunshine.blogspot.co.nz/2012/12/show-tell-post-christmas.html


Tuesday, 25 December 2012

icecream christmas trees

I made these for the family kids that came to Christmas lunch today. Line cardboard party hats with baking paper, push slightly soft ice cream into them ( we used goody goody gumdrop) and re- freeze. Just before serving get them out of the freezer, peel off the baking paper, put them on a plate, decorate with more lollies and serve. We put green jelly on the plate too and I bought the fondant stars off trade me. I LOVE Christmas!


Sunday, 23 December 2012

rudolf the reindeer cakes

M and I made these for the kids at a friends Xmas dinner tonight, he he he.


The recipe is here: http://www.kiwiwise.co.nz/recipe/chocolate-rice-bubble-cakes

We used pretzels for the antlers, jaffas for the noses and half mini marshmellows and silver cashous for the eyes.

Chocolate Rice Bubble Cakes

Prep time:   10 minutes
Servings:   2 dozen

Ingredients:
250g kremelta
4 cups rice bubbles
1 ½ cups sifted icing sugar
1 cup dessicated coconut
4 tbsp cocoa

24 mini paper cupcake liners

Directions:
Melt the kremelta over a low heat.
Mix the rice bubbles, coconut, cocoa and icing sugar in a bowl and pour in the kremelta. Mix well and scoop into the cupcake liners. Refrigerate until set about 20 minutes.

Friday, 21 December 2012

puppet love

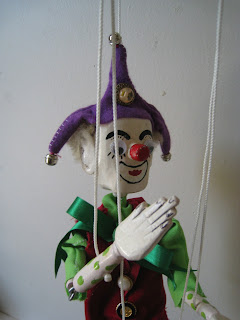
My dad is really clever. As a kid he made us lots of things, one of my favourites was a puppet, he hand carved and painted it. It wore a satin suit with green buttons and had pink stripy socks. I've had him all my life. About 6 months ago...in the middle of the night... I wondered where he was.

In the morning I got up into our attic and found him tucked in a box. His suit had been eaten by silverfish, his buttons were loose and he looked a bit sad.

For a bit of fun I had the idea to send him to dad to see if he could fix him up for the kids for their birthdays. Dad lives in Perth so I took a bit of a risk sending him NZ post!

He arrived back to us today (with a sock puppet friend). I love him from the silver bell on the top of his new hat down to the red bells on his boots!

I'm sure the kids will too.

Thanks heaps Pop xo


What should we call him?

Have you kept any toys from your childhood?

Thursday, 20 December 2012

a poem for my nana

I will breathe in the smell of the sea, fresh rain and newly knitted wool and breathe out comfort.
Where did the time go? 
Childhood seems like yesterday, eating cherries, gooseberries, chips and eggs and the best scones I've ever tasted.
Building tree huts, up on your step stool doing dishes, your arms around me in a hug.
Years later I towered over you and you'd fit under my chin.
I'll miss watching your eyes sparkle with love as you held our babies, the smell of your perfume, your softly wrinkled skin, shopping days out, fits of giggles, long phone calls that always ended with
'love you'.
I'll miss it all. I love you Nana

xo


our girl's 5th fairy party

I know, not a very imaginative theme but it was her party- not mine : ). At least it was easy for me to source the supplies- we used a lot of things we had at home already and the rest we made. I thought I'd share some of the details I had the most fun with.
mini cupcakes with fondant flowers
favours- clear boxes of marshmellows, jaffas and hard caramels
wrapped wire 5

mini fairy wands

strawberry toadstools


food table

card bunting and name

edible fairy wands- grissini, nutella and sprinkles

cake

mmmmmm layers of pink
 
rice bubble 'bird's nests'

flower pinata - our how to here : http://beckypiesky.blogspot.co.nz/2012/12/a-flower-pinata.html

we had to have fairy bread!

and we made fairy garlands
<center> <a href=" http://3xsunshine.blogspot.co.nz"

Joining in with Thursday's shown 'n tell http://3xsunshine.blogspot.co.nz/2012/12/show-and-tell-on-thursday

Tuesday, 18 December 2012

the big day

Two fabulously creative women I know have just launched a beautiful blog I'd like to share with you. I strongly suggest you have a browse and tell anyone you know who's planning a wedding - especially if they're on the search for some inspiration  http://thebigday.co.nz/

The thing that makes it stand out from other wedding blogs is that you can search for ideas using a nifty colour palate on the site, click on the blue dot and all things blue come up- brilliant!


"The Big Day is everything we imagined it to be. Two childhood friends mixing their love of all things wedding and design (and duck egg blue) - wrapping it all up in one fabulous site and being able to share it with you. You could say we’re your online bridesmaids, but ones you don’t have to invite to your wedding!  

We love that feeling of excited anticipation leading up to The Big Day, and those ‘be still my beating heart’ moments when you can see two people in love and know they are meant to be, take our breath away.  These things inspire us and make us love what we do even more! The Big Day will share these moments with you, find the love and bring you creative ideas, collaborations and gorgeous inspiration that we hope will take your breath away and help make your big day, you.

We can’t wait to share in your love, laughter and happily ever after.

Love Angela Townrow + Angela Beynon-Lee".


 © 2012 The Big Day.
All content and graphics are copyrighted.
Please don't steal the goodness.

Sunday, 16 December 2012

how to follow this blog : )

Here's the instructions ( taken from Blogger help) of how to create a Google account and follow my blog ( and others). Trust me, once you sign up and start adding blogs to your Reading List- you'll never need to buy another magazine again- there's so much reading pleasure to be had : )

Creating a Google account

Google Accounts is a unified sign-in system that gives you access to:
  • Free Google products, including iGoogle, Gmail, Google Groups, Picasa, Web History, and more.
  • AdWords and Google Checkout.
If you've used any of these products before, you already have a Google Account. To try new Google products, simply sign in with your existing Google Account. Your account username is the email address you entered when you created your Google Account. If you use Gmail, sign in with your Gmail username.

If you don't have a Google Account, you can create one now.

Following blogs

Following a blog shows authors and readers of the blog that you're a fan, and you can keep track of the blogs you follow via your Reading List on the Blogger dashboard. Following a blog will also create a subscription to the blog in your Google Reader account.

There are several ways to follow a blog. One of the easiest ways is to visit a blog that has added the Following widget and click on the "Join this site" button under the "Followers" widget:
After you sign in with your Google Account (or another account if you so choose), you'll then see a popup window with the options to either follow publicly or privately.

Select how you'd like to follow the blog, then click the "Follow this blog" button. If you elected to follow the blog publicly, your profile picture will be displayed on the blog with a link to your Blogger profile or Google+ profile (if you've opted to link your blog to your Google+ profile).

When you become a follower of a blog, the blog will also be added to your Reading List on your Blogger dashboard. You can become a follower of any blog or URL (even if the blog doesn't have the Followers widget) by adding the blog to your Reading List on the dashboard.

Wednesday, 12 December 2012

a mermaid costume

The kids have a mermaid party next week and with no 'real' costumes I've had to get creative. The good thing about being a fabric and other stuff hoarder is that after a good rummage I can often put something together pretty easily. I made a long skirt out of some green crushed satin, cut a tail shape, hemmed it and drew scales on with a gold marker:

The rest of the costume is:

~Her already owned gold sequin tee shirt ( k mart) and green jandals ( cotton on kids)

~Necklaces and bracelets from the dress up drawers

~Strips of ripped green and purple satin and a shell xmas decoration tied to her fairy wand

~Green satin made into a skirt with the bottom cut into the shape of a tail

~A purple hair tie with more fabric strips attached 

~I'll paint her fingernails and toenails gold the day of the party and she's said she'd like 'crinkly' hair so will go to bed with her hair in plaits the night before : )

The boy is going as Sponge bob square pants- being less creative with him and just borrowing a SB hat and tee shirt.


Monday, 10 December 2012

a flower pinata

It's the girl's 5th birthday party next week. She requested  a fairy theme but I didn't want to make a fairy pinata ( something about hitting a pinata that has a face bothers me!) so we made a flower- modeled on my favourite flower the peonie.

We used a big round balloon as the base, paper mached it in four layers, painted it pink and glued on the petals. The petals are pink paper place mats I cut up. I used some green cord and felt to look like the stem and leaves. There's freddo frogs, fairy bookmarks, fairy and pirate body stickers and lollipops inside : )

Not a great photo but you get the idea, making a pinata is so much fun.

I'm also looking forward to getting everything together for her party. Some shudder at the thought of spending a morning baking for a party and icing and sprinkling up a storm but I LOVE it.

I'll add some photos after the weekend- keep your fingers crossed for nice weather for us!


Thursday, 6 December 2012

our gingerbread house

Last weekend we made some gingerbread men for a friend and had so much dough left over that I had the idea to make a gingerbread house with the kids. The recipe is here: http://www.foodinaminute.co.nz/Recipes/Gingerbread-Men. I cut 2 squares for side walls, a front square with a door hole cut in it and two pieces for the roof. I used a spoon to make the roof tile pattern. I took the photo and then realised that we'd need two triangles- front and back for between roof and front and back parts- so put them in the oven later.


I also came across this recipe for gingerbread 'glue' http://kidsactivitiesblog.com/gingerbread-house-glue/ . It uses meringue powder so I had to go and find out what that was and hunt some down at the supermarket. For people from NZ something similar available in supermarkets is Edmonds Pavlova Magic, it's in this cute little egg shaped container.


So after all of that I started to construct our little gingerbread house.  With the icing made and the lollies on I began to try and piece it together- hmmmmmm it wasn't as easy as I'd thought it would be.

First the roof caved in....

It did that more than a few times...


So I gave up and ate it. It was good.


On the plus side- the icing mix was definately stronger than just an icing sugar and water one.

If you've made a gingerbread house from scratch I have great respect... any tips for my 2013 attempt are welcome. I'm thinking building in stages, refrigeration and props to hold things in place : )

Monday, 3 December 2012

a book advent

I didn't get around to making or buying our kids any sort of advent calendar this year. I've decided to make up a book advent for two weeks out instead. I like buying the kids books and as their birthdays are a week either side of Christmas Day I had a few aside as presents already. I'm waiting on the last two Christmas themed ones from https://www.bookdepository.co.uk.

Starting with the 12th of December I wrapped 12 books up separately, alternated them ( his and hers). and put a date sticker on each. I've seen this done before, with books that are just about Christmas- but I've wrapped a range of books- some picture books, a few simple chapter books for the girl and some non fiction titles too.

I'll stack them up next to the Christmas tree. They'll get turns opening one each night before bed. There's a special one on Christmas eve ( The Night Before Christmas) with new pjs too : )

I think we'll all enjoy this little routine. I also think the books will get the attention they deserve as I suspect if we gave them to them alongside the 'probably a bit more exciting toys' on Christmas day- they wouldn't!


Sunday, 2 December 2012

bike basket

This tutorial http://www.noodle-head.com/2010/06/bicycle-bucket-tutorial.html gave me the idea. I followed the instructions for the basic shape but because my interfacing wasn't stiff enough I threaded some wire through the top hem. I also used ribbon to tie ours on as I was out of velcro ( and secretly- the handles looked too hard for me) : )

Noodle head's is much fancier in that it's lined and made using lovely fabrics- but ours does the job. I've asked my mum to make the kids one each closer to this style as she's a much better on a sewing machine than I am and also much more patient!


Noodle head's yum fabrics
pink cord and the bottom is a purple floral.


Now Poppy cat can ride in style!