whimsy

whimsy

Thursday 30 May 2013

T's bird friends

T has always liked birds, seagulls at the beach ( might be because he saw one fly and steal a chip from my hand once), the cockatiel called Sam at Willowbank (maybe because he's heard him say hello and 'wanna cracker' ) and the birds at home that he sees eating from the feeder we put in 'his' tree together.

He likes watching them and is the sort of kid that really pays attention to things that interest him. A few days ago on a long car ride he yelled out that he'd spotted a group of birds making a Y in the sky as they flew- it was cute how excited he was.

A few days ago he reminded me that we hadn't filled our bird feeder for a while. He'd made a pine cone bird feeder at pre school and told me about it when he found a pine cone in Hagley park yesterday. It's pouring with rain today so we thought we'd make one.

We used:

peanut butter
mixed wild bird seed
cornflakes
pine cone
strong string
a spatula
a plate

Tie the string to the top pf the cone. We chose to tie it this way up as I thought the smaller birds could sit on it more easily while they ate.

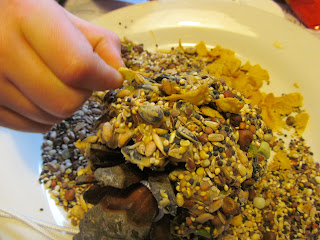
Spread the peanut butter on with the spatula and push some into the gaps of the pinecone. You don't need to use heaps of peanut butter- we used about 2  tablespoons.

Roll the cone in the bird seed so it sticks to the peanut butter. We pushed some cornflakes into the holes- you don't need these but T thought they might like them and I agreed.

Hang it in a tree and look out the window.  You won't be waiting to see the birds snacking- ours was gone in a day : )


Tuesday 28 May 2013

a birthday card from magazine pages

I have lots of old magazines. I find it especially difficult to put my copies of Your Home and Garden in the recycling. I saw this idea on Pinterest and thought it would be a good way for the kids to make a birthday card and to use up one of my older mags......I have to let them go sometime or I'll end up in that hoarders tv show lol.

It's a very simple idea but lots of learning and discussion of letters and their sounds went on around it. As I cut each of the letters out we talked about that sound and the letter name as we glued them on, it was gorgeous hearing our big school girl teaching her little brother too.


Saturday 25 May 2013

T's bed do up

T wanted a yellow bed. I knew a test pot of paint wouldn't cover the whole bed head so I decided on stripes. The pics say it all really, mask, paint, let it dry, pull the masking tape off, give it a touch up and you're done. 

The paint colour is Resene Wild Thing- kinda appropriate!

T loves it and I'm really looking forward to seeing it back in his newly repaired and re- painted room.


Thursday 23 May 2013

another goooooorgeous giveaway

Stella of the Golden Adventures of a very dark horse is having another AWESOME giveaway here: http://verydarkhorse.blogspot.co.nz/2013/05/a-giveaway-for-mamas.html


Here's the details of the prizes copied from Stella's blog...if you won you could keep them all for yourself, keep some and gift some. I LOVE the fox dress and the lovely cloud  pillow it's pretty exciting thinking that someone who reads this might win : )
 
 
1. Brass Drop Necklace - by Sly Fox (valued at $35 nzd)
8. Fox Brooch - by Poofy Dove (valued at $12 usd)
10. Child's Pug Tee - by elephant + bird (valued at $20 usd)
11. Hot Air Balloon Kit - by Craft Schmaft (valued at $65 usd)
12. Fox Dress - by Wild Things Dresses (valued at $60 usd)


So there you are, you now need to go follow Stellas's blog and enter- as M says "easy peasy lemon squeezy".

Wednesday 22 May 2013

black ball point pen and watercolours

Blah- it's still raining. Luckily for us both kids love to paint, watercolours don't make much mess and our kitchen table was bought for just this sort of thing.

The teacher in me was very excited to find a big forgotten stash of black and blue ball point pens the other day- perfect timing for starting my new job share position in a few weeks time. I don't know where pens go in work places... kind of like socks in homes!

I like to set the kids up with paints, a cup of water and a cup of brushes. I change the water for them when it gets murky.

Such a simple idea but sometimes it those that are the most satisfying.


Monday 20 May 2013

M's pretty bed

We've been talking about paint colours as ( can I get a woo hoo?!) we're having our repair done next month. M wanted pink in her room and T yellow. I can't bring myself to paint their walls in anything but a neutral ( I know, I know) but I've agreed to paint their beds the colour of their choice. 

About a year ago I won a metal bed head and end set off trade me for $11 that I planned to do up for M. They're not vintage, just 1980's copies so I had no issues with painting them. I bought a can white primer spraypaint and 3 cans of magenta spray paint from Bunnings and went to town!

The husband measured and drilled some new holes in the metal legs to allow for the bolts. M is over the moon and loves her new bed- it makes me happy too : )

Before

base coat

magenta!


a happy kid : )


Friday 17 May 2013

egg and dairy free chocolate muffins

Yum, I am surprised at how tasty and light these are so had to share this- recipe found here


I have been dairy free for a fortnight to see if it improves my asthma symptoms... no huge changes yet but I'll stick with it for a bit longer- especially now I can have treats like these : )

This is the most divine recipe for a dairy free and egg free chocolate cake! It makes an impressively large, deliciously moist cake and best of all, it only takes 5 minutes to prepare. For chocolate lovers, this is a must have recipe - even if you don't have allergies! 

Prep time:   5 minutes
Cook time:   55 minutes
Servings:   1 cake

Ingredients:
3 cups flour
1 Tbsp baking powder
6 Tbsp cocoa
2 cups sugar
1 tsp baking soda
1 tsp vanilla
2 Tbsp vinegar
½ cup cooking oil
2 cups water 


Directions:

1. Sift dry ingredients through twice.
2. Add liquids and mix well.
3. Bake at 170°C in a 20-22 cm round greased tin for 55 minutes or until skewer comes out clean.

Variations:
36 mini muffins (bake for 10-15 minutes)
18 standard muffins (bake for 20 minutes) 

We usually make the mini muffins and freeze when cakes are cool. They can be taken straight from the freezer to the lunchbox. They are excellent to take to children's parties decorated with your favourite icing and suitable sprinkles i.e. hundreds and thousands, rainbow sprinkles, passionfruit, coconut threads, dinosaur lollies etc.

Tuesday 14 May 2013

goldsworthy

I recently came across an artist's work on the www that I liked called Andy Goldsworthy. He's a British land artist who works with a variety of natural materials. Much of his work is lasts for a short time as they're made with things that will quickly blow away or decay, such as with his leaf pieces.

We have a big sycamore tree in our back yard and it's dropping it seeds and leaves right now. We made dragonflies with the seeds here and I wanted to do something with the leaves. Last year we made this lovely coloured window art using them.

A week ago I collected leaves from around our section. I pressed them under magazines for a few days so they were flat. I showed the kids some Goldsworthy images and asked them if they wanted to make a 'pattern' to show dad when he got home, they were keen as usual. Starting from the centre we worked outwards. I talked about the circle shape, the ways the colours changed etc.

Here's some examples of Goldworthy's work:


And here's our effort, it's not Goldsworthy worthy but for some mum and kids time spent sitting in the front garden enjoyong the Autumn sun- it's just right : )

More of Goldsworthy's work here


We also used the pressed leaves for some good old leaf rubbings. The kids got frustrated with their leaves moving around so I found that if I taped the leaf to the table they were able to create more satisfying images. Oil pastels also work better than crayons.

T had to 'make' a llama, he's in to discussing llamas and alpacas at the moment : )


Saturday 11 May 2013

leaf crowns

We bought T a new bookshelf today and the packaging included some nice even strips of corrogated card... I know, I'm easily pleased.

A wee while ago I saw this  very cool feather head dress made by Louana of nz green buttons. The feathers were poked down into the little corrogation holes. Have a look at the link to get a better idea of the instructions- she explains it much better :).

We poked leaves in ours and I used masking tape to make a sticky strip across the front for attaching leaf 'jewels' as T called them.

When they'd added all of the leaves I wrapped the finished crowns around their heads. When I had the correct size I wrapped more masking tape around the join to finish.

It was a happy half an hour : )


Wednesday 8 May 2013

don't throw that out- it's a dragon!

M's teacher gave her some books to read over the holidays. One of her favourites was this one called 'Don't throw that out'. It's about a resourceful little girl who rescues 'trash' to create a dragon.

I love it when our kids get excited about a book so I thought we'd take it a bit further and have some fun with it. We went through the book page by page and gathered up the things that the book character did.

We used an egg carton, some card tubing, a milk carton ( we used a small bottle for this bit) some orange sticky book cover, green card and green and red paint and brushes. I made the dragon while both kids directed me and kept me as close to the image in the book as possible. They painted it and added the red dots.

I used some paper tape I've had forever. Masking tape would work too as it can be painted.

We had lots of fun with this book and it was great seeing the kids excited faces and listening to them compare our dragon to the one pictured.

And the consensus..

" You did  a pretty good job mum"

 x


Monday 6 May 2013

my chair

Here's the next chair, mine for my desk. Not every tiny trace of paint is off it but I like it they way it is and I'm happy with how it came up.

It was a lot of work stripping off the blue paint (which is why this one is the only one that will have a wood finish).  If you've never sanded wood back and then applied linseed oil then you should, it's sooooo satisfying seeing the oil soak into it and watching the colour of the wood change.

The seat fabric is a fat quarter from By the yard, Dandelions in Gray on White from the Pure collection by Stof.

I was fiddling with another piece I got too- Backyard Baby, Birch Forest. I put that in a big embroidery hoop to display on the wall white I decide what to make with it. I'm liking the little woodpecker. 

I'm thinking that that fabric and something else nice might eventually re-cover the shade I have for my standard lamp.


Here's a reminder of how they looked when we found them on a bonfire.