whimsy

whimsy
Showing posts with label diy. Show all posts

Wednesday, 15 July 2015

a cardboard dollshouse

Inspired by these images and post about cardboard American brownstone style houses on the beautiful blog http://mermagblog.com/


M has decided to sell her Sylvanian furniture. I have to admit she hasn't really played with it much and the most recent purchases may/ may not have been because I liked them! They are overpriced though so I'm quite pleased this stage is behind us.

She's said she would prefer to make something her own. We've made the house together and M plans to make things for inside it over time, T has an awesome idea for how t make light shades. I've kept the hedgehog family and few pieces of Sylvanian furniture until then. While ours isn't as exact as the inspiration, we still like it.

I took heaps of photos of the making process which involved a washing machine box, a craft knife, an entire roll of masking tape, paint and printed washi tape. The kittens moved in to the 2nd and 3rd floors too- but sadly I lost them : (


Sunday, 5 July 2015

homemade kinetic sand

M and T have been asking for kinetic sand for a while now. I don't really want to pay so much for so little of it so thought we'd have a go and making something similar. While this isn't as 'sticky' as the store bought stuff it's still really fun to play with, smells nice and holds its shape well.

After looking around the www I came up with this recipe:
  • 5 cups sand( the finer ther better, we started sieving ours but gave up)
  • 1.5 cups cornflour
  • 1/2 teaspoon dish soap (e.g. Dawn Dishwashing Liquid)
  • water (about 1 cup)
  • optional: 1 teaspoon Tea Tree Oil (for its antibacterial properties)
  • optional: fine glitter
Just out it all in a big container and mix- adding the water a bit at a time. I mixed the dishwash with the water first.

So that was them for the afternoon- nearly 2 hours of playing with it under the Winter sun  : )


Saturday, 15 November 2014

Christmas doll

I finished the gift doll last night by sewing her face and giving her a flower headband. I like how she turned out, I'm not great at stitching neatly so I'm pleased with my efforts.

I have seen the uber talented Dee from Tiny eyes  make these baby dolls, so thought I'd try and make one ( minus the hat as knitting is just waaay to hard for me).


So mummy doll has a baby and a sling to carry them in. I'm looking forward to seeing how she's received at Christmas.


Thursday, 16 October 2014

our kitchen floor

I don't have great love for our kitchen. It's old, the formica bench is warn and the cupboards and drawers don't shut properly. While I might reeeeeally dislike it, I also believe that we should appreciate what we have-and I saw in it an opportunity to be creative!

I'm hoping ( everything crossed) that we'll get a new kitchen and floor early next year so this is my chance to have a bit of fun. I chose 3 colours of Resene test pots I liked, a red a turquoise and a mint colour. I drew a rough plan ( that I ended up abandoning) and then painted each colour, one at a time. I didn't bother with masking tape etc- I didn't have enough patience or time for that!

There's a pattern and then there isn't- it was more about making sure colour got on the worst looking floor boards.

I like it , the husband tolerates it and the kids are its biggest fans : )


Tuesday, 5 November 2013

command strips

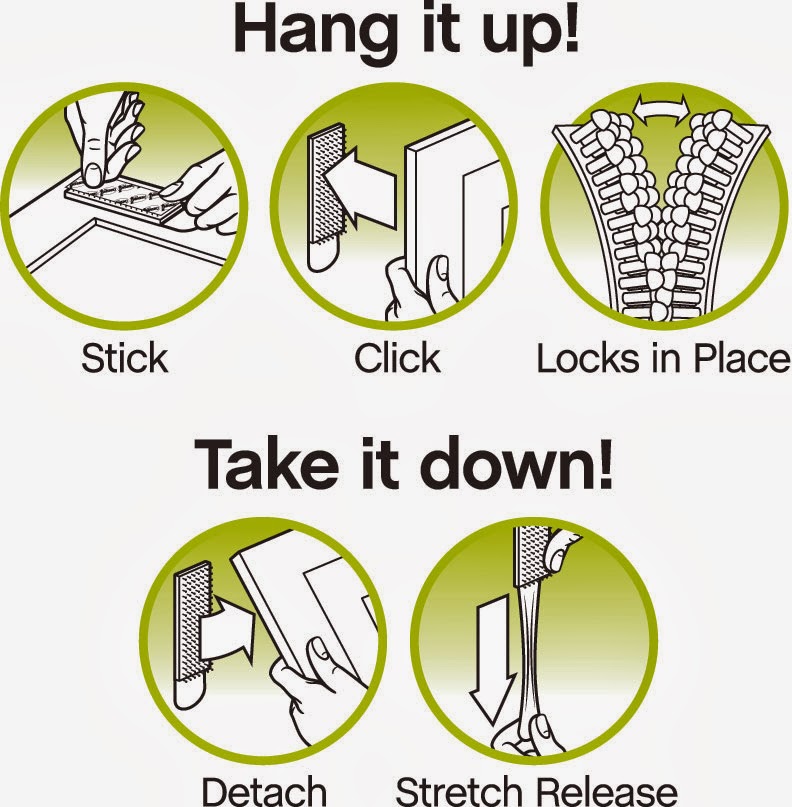
These are awesome! A marketing company sent me some packs of these Command 3M picture strips to trial. I was really impressed at how one medium sized strip could hold each of the picture frames. I had to move one too and they made no marks or damage at all- a big whew for my newly painted walls!


I used some of them to put a print and some of M's art work up in her bedroom. Chuffed to get some for free but will happily pay for more the next time we need to put up pictures : )


Thursday, 12 September 2013

a polka dot wall

I have coveted these types of polka dot wall decals for some time. I like the idea that they're not permanent ( I'm always changing things around at home). I like that with decals I don't have to make my mind up about anything that's long term- the thought of having to decide on wallpaper for the kid's rooms would just be too much for me. I could never build a house- too many decisions to be made!

http://www.thehomesihavemade.com


http://downthatlittlelane.com.au

Recently I found this site http://polkadotwallstickers.com/

I bought 60, 2 inch ( that's 5cm-ish ) gold dots for $8.98 US plus $10.99 US shipping ( which came to $25 NZ inc postage). I couldn't find them cheaper anywhere in NZ.

After putting them on a bigger wall and then changing my mind I found out that the stickers came off  really easily and repositioned well too (whew!). We're going for a random look for now but one day I may like to spend the time spacing them out evenly : ).

I've hung the pin board we made together low enough for her to pin whatever she likes on it. Pre-quakes she was just sticking things up with blue tack but now that our walls have a fresh coat of paint she's not allowed!


I love it, it makes us both smile...


Saturday, 10 August 2013

brown bear, brown bear ...

...what do you see? I see a new chair looking at me!

This last of the rescued chairs  do up was inspired by one of our boy's favourite books Brown Bear, Brown Bear, What Do You See? by Bill Martin, illustrated by Eric Carle.

I also painted his desk drawers red, yellow and black. The fabric is a $6 fat quarter from http://www.bytheyard.co.nz/ . He loves it!


Saturday, 25 May 2013

T's bed do up

T wanted a yellow bed. I knew a test pot of paint wouldn't cover the whole bed head so I decided on stripes. The pics say it all really, mask, paint, let it dry, pull the masking tape off, give it a touch up and you're done. 

The paint colour is Resene Wild Thing- kinda appropriate!

T loves it and I'm really looking forward to seeing it back in his newly repaired and re- painted room.