Wednesday, 30 January 2013

school books covered

Our girl starts school next week. She's really excited and we are for her, she's so ready to go. Being a parent as well as a teacher may explain why I'm so keen to promote anything that will encourage her to take pride in her work. I love seeing kids with books that have been covered at home. I think it's a fun for way them to express themselves and share a bit of their personality with their class. I also love to do this kind of thing!

We have a big stash of supplies so before bed time I let M choose some old birthday cards, scrap book paper, stickers and wrapping paper that she liked. I ( the book cover fairy) glued them all together while she slept. Each book is different, because it's fun and because I knew I'd like doing it.

I made my life a bit easier by buying clear Ez covers for some of the regular sized books. They're sinple to put on and can be used again and again. They have fun designs and colours but we went for clear so we could decorate the cover ourselves first. I used clear duraseal for the other books ( sooo much harder!). Here's the link for the ez covers: https://www.ezcover.co.nz/faq.htm

Here are her books, I like the owl and tight rope pig ones best. M is pretty keen on the fairy ones and thanked me this morning saying ' I just love them all'  x


Monday, 28 January 2013

diy chalk

I read a recipe for diy chalk recently. I know chalk is inexpensive to buy. I just wanted to have the kids make it themselves and colour it. I read that the colours can be made to be more vivid when making your own too. 

It's just a cup of plaster of paris, a cup of water and some food colouring or powder paint. We used food colouring. For molds we used toilet paper rolls (with glad wrap and masking tape at one end) and a styrofoam cup. We mixed the plaster of paris up in the cut off bases of fizzy drink bottles and used ice block sticks as stirrers.

Some of the colours were definately more vivid and the mixture was softer than chalk and felt more like drawing with an oil pastel. Some of ours were a bit messy because the food colouring sunk to the bottom, the kids used a paper towel to draw with those.


Thursday, 24 January 2013

fishy business

For the boy's 4th birthday we got him an aquarium and 3 pet fish. He named them Mr Muscles, Milo and Lightening. We went away for 3 nights and asked our next door neighbour to feed them for us. Something went wrong with the tank set up and we came home to find Mr M and Milo had died : (.

I got some advice from the pet shop we got them from and we think it was something called 'new tank syndrome'. The nitrates and nitrite levels weren't in balance which lead to high levels of ammonia and then ammonia poisoning. I swear when I was a kid I just put a couple of goldfish in a bowl of tap water with some oxygen weed and they were fine- there were no expensive drops/ water treatments necessary.

Anyway, after some expensive drops, several water changes and three trips to the pet shop to have the water tested- we finally got one more fish for the tank- Mr Muscles the 2nd.

The back of the tank is up against his wall and we have filter and light cords visible. I thought it might be fun for him to create a scene that we could attach to the back of the tank as a background. He ( with some help from his sister) has drawn some 'seaweed', rocks and a few purple and pink fish friends swimming upwards! It looks much better than wall and cords and as you can see he's very chuffed with his efforts : )

Lightening and Mr Muscles II


bless 'em xo


Tuesday, 22 January 2013

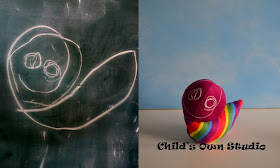
sketches to softies

I am so in love with this idea. Child's own is a studio that custom makes toys with children. Children send in their drawings that are then transformed into soft toys by the artist Wendy Tsao. Wendy created Child’s Own Studio in 2007, after making her first softie based on a sketch that her 4 year old son was constantly drawing. 

http://www.childsown.com/

"I am inspired by the child’s drawing, a wonderful expression of childhood.   Typically, a drawing is sent to me, and I decide if I can work with it.  (I normally work only with children’s drawings, hand-drawn and coloured).   There may be notes included with the drawing.   I may ask for clarification about some details.   And then I get to work, in my Vancouver studio.  The machine whirs, scissors snip, needles zip, and everything gets covered in fibrefill fluff.  Details and color choices are reproduced as closely as possible, and I may use some artistic licence – unless you specifically tell me not to. When I am happy with the finished softie, I take photos of it and send them to the customer, before shipping the softie to the young artist."

"I celebrate children’s art with hand-crafted softies and give young people a sense of the soft, small comforts they can make and of what power they have, with their imagination.  Children need to know this, so they grow up knowing the power of designing, making and crafting all sorts of things for a civilized world. " Wendy Tsao

Aren't they wonderful?!

Allie aged 6
Zara aged 5
Amelie aged 7
Emelina aged 9
Emilie aged 6
Devon aged 10
Javinda aged 2
Veronica aged 7
Malia aged 6

There's more gorgeous softies to see here: animals
here: dolls

I also really like this idea: your child's drawing appliqued on to fabric


Sunday, 20 January 2013

a pin board d.i.y

Last year I was given a lovely big gold painted frame. I knew straight away what I'd use it for so this really should be called a d.i.m- did it myself : )

We have lathe and plaster walls so it's very tricky to put any screws, nails, thumbtacks or picture hooks in the walls without having plaster fall out in wee clumps-  it makes a real mess. When our house gets its post quake fix we're really hoping it will be re-lined in gib board, if that's the case we'll want to protect the walls and not put too many holes in them. This little project was all about creating a place for M to display her art, photos etc with minimum wall damage.

I started by buying a piece of pinboard that would be big enough to fit in the frame. I got ours on trade me for $15. I cut the board to size and put it in the frame securing it with liquid nails. I then gave the frame and board three coats of white paint. We started painting while the clamps were still on because M is as impatient as I am!

It now hangs above M's little desk and she only wants to put 'school stuff' on it when she starts next month. The piece of pinboard we got is massive so I have another piece the same size. I'm now on the lookout for another frame so I can make one for T's room.


Friday, 18 January 2013

plaster of paris at the beach

We love the beach, especially in the morning when there's less people and it's not as hot. The last time we went we took some plaster of paris with us to experiment with making molds in the sand. It was a bit hit and miss as I don't think I added sea enough water the mixture so it was a bit thick- the hand and foot molds we tried weren't deep enough for the plaster so we ended up making made blobs with shells on. Nice blobs that will always remind me of one of their favourite places.

We dug little holes in the sand, pushed a shell in and added the plaster on top. It took about 25 minutes before the plaster was hard enough to be dug out of the sand and left in open the air to dry fully.

Next time we try it I'll take an old cup and measure the plaster and water out properly. We'll mix the plaster closer to the water and I'll have the kids make their molds in the wetter sand. We were a bit too high up the beach as was worried that the tide coming in would was them away before they were dry enough to move.

At home I sprayed a few coats of polyurethane on them so that the sand didn't come off and go everywhere. I bought the plaster of paris off trade me but I'm sure most hardware places would sell it.

Here's the found blog post that inspired our experiment : )

http://www.danamadeit.com/2012/07/tutorial-sand-and-plaster-beach-molds.html


in its special place on his mantel

Wednesday, 16 January 2013

art set bargains

I thought I'd share a bargain we got the kids this Christmas. These drawing and painting supply sets ( with a paint brush, glue, a ruler, eraser and paper clips) were $10 each on 1- day http://www.1-day.co.nz/. It's a site that's worth keeping an eye on as sometimes fun things come up at good prices. I'm currently keeping an eye out for a swing ball / football set a friend got on there. 

We had the kids draw a picture on the outside of their set so that we could tell them apart. The felts and pencils aren't the best quality but they do the job. These sets and a pile of scrap paper kept them both quiet and happy for over an hour at a time on holiday while I sipped shandies and sat in the sun- win, win : )


Tuesday, 15 January 2013

new years party hats

We (our kids and some others that were nearby) had a party hat decorating session in our tent on December 31st. It was nice for us all to get out of the sun for a while and be creative. I just packed some regular party hats, sellotape, scissors, glue, stickers and a bag of gift bows and ribbons that I'd collected. I'd thought about taking some noise makers and party poppers for them but decided the nearby campers wouldn't thank me for it- he he. We put on some music and had a dance instead- fun times!

This is something I'll do again and can be easily adapted for birthday parties or other celebrations.


Sunday, 13 January 2013

stills- a fab link in

I love following Stella at http://www.verydarkhorse.blogspot.co.nz. One thing I wanted to do this year to 'channel' my blogging is to join in with a few weekly link ins or linkys. 

I love finding new blogs to read and being inspired by other bloggers. So far I've found:

an 'op shop show off' one where you share your awesome opportunity shop finds on Tuesdays at http://blackbirdhasspoken.blogspot.co.nz/2012/12/are-you-op-shop-show-off.html.

A Thursday 'show n tell something you've made' one at http://3xsunshine.blogspot.co.nz/2012/12/show-tell-post-christmas.html

Miriam's 'becoming the mama I want to be' linky, sharing special activity ideas to do with your kids at http://createhopeinspire.blogspot.co.nz/2013/01/bmwb-2-book-bucket.html.

Now this one that appeals to the photography admirer in me. This lovely link in is hosted by Em at http://www.thebeetleshack.com/. It's an opportunity every Sunday to share a weekly round up in still photo format- gorgeousness huh. The images shared on the Beettle shack are wonderful so if you like photography, go and have a look.

Here's some images of our holiday at the family hut at the Rangitata River on the East Coast of the South Island, New Zealand.


1. Bonfire on the beach at midnight
2. Watching the surf cast
3. Exploring
4. An unhappy looking lunch
5. Being curious about the catch
6. Searching for pretty stones for nana